
High Dynamic Range Photos

Parliament Hill from the Alexandra Bridge

I’ve created my first high dynamic range (HDR) photos. I went on a photowalk last Friday with Mike and Haitham from the Nortel Photography Club. We started at the North end of Lower Town and moved across the Alexandra bridge to the Canadian Museum of Civilization.
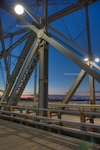
Alexandra Bridge
Alexandra Bridge

My Canon 40D supports exposure bracketing, which is perfect for taking HDR photos. I set it to automatically take a metered exposure, then take one shot that is underexposed by 2 stops and one that is overexposed by 2 stops. The amount of over and underexposure can be configured in 1/3 or 1/2 stop increments. I also used the LiveView feature to take the photos, so that the mirror would not bounce, which would cause vibration and blurring. Even though I was using a tripod, I tried my EF-S 17-55mm f/2.8 lens with image stabilization on and off to see if it made a difference – it did not.

I downloaded a trial version of the Aperture Photomatix plugin by HDRSoft. I kept all of the settings on the defaults to create the HDR photos. It worked great. The price is high ($79.95 USD), which is why I have not bought it yet. Perhaps later this year if I feel a strong urge to create lots of HDR photos.

Hacking the Macbook Pro

I have a 2.4Ghz Macbook Pro (2007) with a 160GB internal drive. However, I only had 2GB free disk space left. My Aperture library with my 7495 photos was taking 80GB of the 160GB. And I knew I would be bringing back another 20GB of photos from London this July. ITunes took another 20GB.

So, to treat myself after a depressing week of rumors at work, I bought a new 320GB internal drive. I planned out the replacement carefully, gathering all my passwords and serial numbers so that I could quickly build up the system from scratch.

There were only two hitches. The first was that I never got around to buying any Torx screwdrivers. In the past, I was able to get around this limitation with a flathead screwdriver that would fix in the star pattern. However, once I had the laptop open, the final two screws would not come out using this method. I was in my office at work, and it was after 7:30pm on a Friday. I ran down to all of the labs in the building to see if anyone was still around, or if there were any obvious open toolboxes where I could borrow a Torx T-6. It took my 30 minutes before I found one soul still in the lab working late, and he loaned me his Torx T-6. I completed the replacement (and put the old drive in an external USB enclosure) and closed up the computer.

Next was to reinstall MacOS X 10.5 (Leopard), and then all of the software. Everything went smoothly until I hit the second problem when installing Adobe Photoshop CS3 (which was one of the last applications to install). I found out that Photoshop CS3 does not support the MacOSX Extended case-sensitive filesystem, which was the format I choose at the very start of the MacOSX installation. I still can’t believe that the CS3 installer chokes on a case-sensitive filesystem – in 2009? Good Grief!

So Saturday morning, I had to start from scratch again by re-formating the drive, installing MacOSX, all of the applications, patch everything, put in the serial numbers and finally copy over some of my old preferences and email databases.

I was finished Saturday night. I also bought a set of Torx screwdrivers at Canadian Tire. Aside from the two snags, the replacement went very smoothly.